


Products Used (in order);
Face:
Garnier Moisture Match Shine Be Gone mattifying moisturiser
Benefit The POREfessional primer
Estee Lauder Double Wear Foundation in 1N2 Ecru
Soap & Glory Kiss Ass concealer in Light
MAC Pro Longwear Concealer in NC15
Rimmel Stay Matte Powder in 001 Transparent
Sleek Contour Powder in Fair
Rimmel Lasting Finish Blush in 004 Pink Rose
Eyes/Brows:
MAC Pro Longwear as a base
Make Up Geek shadow in Creme Brulee
MAC Veluxe shadow in Woodwinked
MUA shadow in shade 5 (from the Undressed palette)
Maybelline Gel liner in Black
L'Oreal Miss Manga Mascara in Black
Benefit's They're Real Mascara
Anastasia Brow Wiz in Ash Blonde
Sleek Brow Kit in Light
Maybelline Brow Drama Sculpting Mascara
Lips:
Revlon Pink Pout
Seventeen Beehive
Hey!
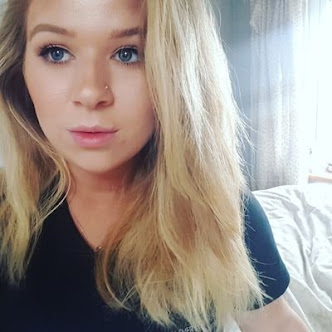
I haven't posted a FOTD in a while and thought since I was enjoying my make up a fair bit today *vain alert* that I would blog it/give you a little guide on how slapped it all on my face!
First of I applied the base, not rocket science I'm sure you don't need me to describe how I did that but I will say I applied the moisturiser and primer with my hands and then user my Real Techniques Miracle Complexion Sponge (review here) to apply my foundation flawlessly.
I then went on with my concealer which was MAC Pro Longwear (review here) which is a shade lighter than my skintone, and I apply this with my Estee Lauder foundation brush. I apply it in an upside down triangle shape as I use it as a highlight as well, hence the shade lighter. I also apply it on my eyelids as a base to even out the skintone and give my shadows something to cling onto/stand out against.
I then move to eyeshadow, I like to do this before I blend my concealer so I don't get any fall out under and if I do then I can clean it up before I set my make up.
I go in with MUG Creme Brulee as a crease colour blending it into the crease, as a transition colour for my other shadows, using my 217. This is also a good contour colour for fair/medium skin tones on the eyes.
After that I go on with Woodwinked e/s all over the lid, I prefer to pat it on to get a deeper and more pigmented colour and after this I take MUA shade 5 and it pat it into the out and inner corners of the lid. Next step is the Maybelline eyeliner (review here), using my Barry M Angled brush, to create a dramatic flick and make the eye a bit more interesting.
Next is the blending of the concealer (finally!) I use my RT sponge again and add some S&G Kick Ass concealer (review here) to my blemishes/red patches. Again blending with the RT sponge.
Powder time! using my Real Techniques Powder brush I pat Rimmel Stay Matte powder onto the whole face and neck to fully set any liquid bases I've used to keep them in place as I have a very oily face! I use my RT blush brush to contour my cheeks, forehead and neckline, to make me look like I have a thinner face, oh make up how I love your illusions! I then use my Avon angled blush brush to apply my Rimmel brush just above my contour.
Next is brows! My 2nd favourite part (1st is eyes!) I use my Anastasia Brow wiz (review here) to get the shape of my brows and then fill them with my Sleek Brow kit powder and set them with my Maybelline brow gel (review here) as my brow hairs are crazy and fly about everywhere without the help of a setting gel!
Penultimately is mascara, I like to do this last so as I don't smudge it onto my face and it has time to set. First I use Benefit's They're Real! (review here) I use this to separate the lashes an give me some length and then I use L'Oreal's Miss Manga (review here) to give my lashes some real volume. I apply a fair few coats as I love big and full lashes I really think they just complete the look!
For lips I make sure I've exfoliated my lips with my lush lip scrub then I applied Revlon's pink pout and Seventeen's classic nude lip, Beehive, for that perfect pinky nude colour that really compliments the contour whilst not taking attention away from the eyes.
Then there we have it! The finished look, it's really simple to create and I always wear it when I want to look like I've made loads of effort, but haven't really!
What do you think of this look? Let me know!
Alicia x
Twitter | Bloglovin' | Tumblr
*If you would like to advertise with me, check out the packages I offer on my Advertising page!


0 lovely messages:
Post a Comment
Thank you for taking the time to comment :) xxx